1) Introduction
This guide is meant to encompass the various features and act as a how-to for various steps that we take when working with and debugging the different salt interfaces. If you are looking for more links to our Salt documentation, I recommend starting at the salt landing page.
2) Pillar Injection and Manipulation
This is handy for creating the custom host-specific override to include extra allow groups and home directory overrides.
(Caveat Emptor: I have not tested comment rendering in the sssd.conf file via this mechanism)
You can test the pillar rendering as you build your custom pillar injections by running the pillar.items command in the following format:
sudo salt-call pillar.items pillar='{"sssd": "test"}'
You can then run the state.apply sssd command to apply just the sssd formula, or the plain state.apply command to do all states at once, sssd included. This wild example populates the desired fields for kia.cc.gatech.edu in one shot, as long as the 01_kia_sssd.conf file does not already exist.
sudo salt-call state.apply sssd pillar='{"sssd": {"install": true, "lookup": {"conf_local": {"sssd": {"services": ["nss", "pam", "autofs", "sudo"]},"domain/gatech.edu": {"override_homedir":["/nethome/%u"],"simple_allow_groups": ["coc-tso", "coc-tso-admin", "coc-hparch-access", "coc-hparch-vortex"]}}}}}
The following text can be used as a starting point to add a few more GRS roles without needing to remove irrelevant roles:
pillar='{"sssd": {"install": true, "lookup": {"conf_local": {"sssd": {"services": ["nss", "pam", "autofs", "sudo"]},"domain/gatech.edu": {"override_homedir":["/nethome/%u"],"simple_allow_groups": ["coc-tso", "coc-tso-admin", "coc-edit-this-role"]}}}}}'
Definitely double check that the resulting file has the expected contents before moving on.
3) Manually enrolling a system into Salt
NOTE: This is intended to be an overview of different methods of installing salt onto systems after they have already had an OS built on to them through alcali or pepper. If you are deploying a new Ubuntu 22.04 machine, use the deployment instructions that are found at https://tso.cc.gatech.edu/info-sheets/server-deployment-landing-page
3.1) Install CoC/TSO Production Salt Configuration
Step 1: Download and Run Install Script
Run the install script as root.
For Ubuntu 18.04, 20.04, and 22.04:
curl "https://gominionconfig.salt.gatech.edu/api/install?unit=coc&os=ubuntu" | bash -e
For RHEL 8 or RHEL 9:
curl "https://gominionconfig.salt.gatech.edu/api/install?unit=coc&os=redhat" | bash -e
Step 2: Approve Minion Key in Alcali
Go to CoC Alcali web page, and accept the key (don't forget to refresh from the bottom right hamburger menu):
https://cocalcali.az.gatech.edu/#/keys
Step 3: Apply the States
Run the state application command as root.
salt-call state.apply
3.2) Key Manipulation (i.e: approval) via pepper
To list the current keys, use wheel key.list_all and check for the minion that needs accepting.
$ pepper --client wheel key.list_all
{
    "return": [
        {
            "data": {
                "_stamp": "2024-06-21T18:16:16.436119",
                "fun": "wheel.key.list_all",
                "jid": "20240621181615901013",
                "return": {
                    "local": [
                        "cluster.pem",
                        "cluster.pub",
                        "master.pem",
                        "master.pub"
                    ],
                    "minions": [
                        "atomhost",
                        "benegesserit",
                        "duece.cc.gatech.edu",
                        "ebisu",
                        "eos.cc.gatech.edu",
                        "ephemeral-2.cc.gatech.edu",
                        "habanero-desktop-1",
                    ],
                    "minions_denied": [
                        "corsica.cc.gatech.edu"
                    ],
                    "minions_pre": [
                        "cordwainer",
                        "eevee",
                    ],
                    "minions_rejected": []
                },
                "success": true,
                "tag": "salt/wheel/20240621181615901013",
                "user": "coc-saltadmin"
            },
            "tag": "salt/wheel/20240621181615901013"
        }
    ]
}
To accept the key:
$ pepper --client wheel key.accept match='["eevee"]'
{
    "return": [
        {
            "data": {
                "_stamp": "2024-06-21T18:06:31.275563",
                "fun": "wheel.key.accept",
                "jid": "20240621180630986537",
                "return": {
                    "minions": [
                        "eevee"
                    ]
                },
                "success": true,
                "tag": "salt/wheel/20240621180630986537",
                "user": "coc-saltadmin"
            },
            "tag": "salt/wheel/20240621180630986537"
        }
    ]
}
If the key was denied for some reason, then the key must be deleted from the master, the minion restarted, and the key accepted:
pepper --client wheel key.delete match='["dev-speet3-vagrant-rhel9"]'
On the minion:
systemctl restart salt-minionBack in pepper CLI:
pepper --client wheel key.accept match='["dev-speet3-vagrant-rhel9"]'
NOTE: The quoting is very important.
4) Working with Alcali
4.1) Prerequisite knowledge
This guide is intended to be an introduction an overview to alcali. While we won't be covering many of the other salt pieces involved, it is recommended to have an initial understanding of salt 101 and what the various salt realms are in order to udnerstand everything that is being mentioned here. That knowledge can be found at https://tso.cc.gatech.edu/info-sheets/salt-landing-page . Additionally, we have a video guide that covers alcali in more detail in our salt 102 training that can be found on dropbox.
4.2) Introduction
Alcali is our web interface for interacting with the salt master, and is a great tool for an overview of the minions, accepting keys, or testing jobs when developing Salt code. It is not necessarily our only interface with the salt master, but it is the one that uses a webpage as opposed to a CLI. This site can be found at https://cocalcali.az.gatech.edu/#/login and can be logged in to with your PSA account once you have gotten the required access. If you are having trouble getting access, please refer to the guide in the Salt 101 page (LINK TO THERE ONCE THAT PAGE HAS BEEN MADE)
4.3) What is Alcali
Alcali is a web service that is hosted by OIT that is able to directly able to interact with the Salt master. Unfrotunately, we do not have direct access into the backend development, but we do have a fair amount of control of the salt master here for any regular day to day task. Generally, alcali is recommended when interacting with individual minions or when the task you need to does not need to be scriptable such as individual minion checking, accepting new minion keys, and checking on minion grains.
4.4) Accepting the Keys
One of the most common tasks that are done through Alcali is accepting the keys of new minions that are trying to register. Eventually, we are hoping to have this process be automatic, but in the meantime, the easiest way to do this is through alcali and manually accepting each new key as they come in.
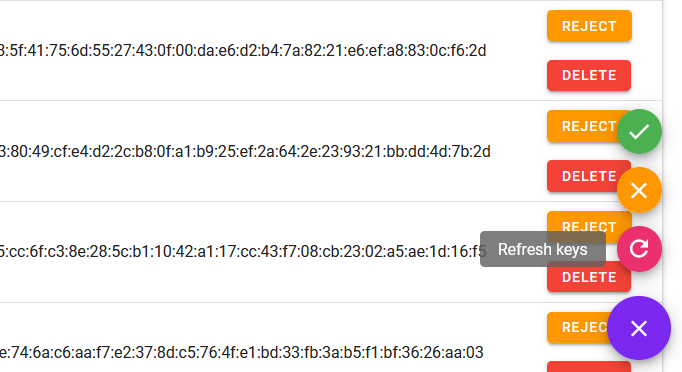
Begin by navigating to the "keys" section on the left tab and you should see a screen similar to below

- In the bottom right, select the hamburger menu and click "refresh all keys". The color coding here is not the best, but this is the one time that you do want to hit the red button
- Once you hit refresh all keys, you will need to wait about a minute or two for everything to load. This process has been taking a bit longer as we've been adding more minions, but you will know when it's done when the page scroll brings you back to the top
- Once the keys refresh, you will want to find the minion you want to add, and click "accept". I usually recommend refreshing all keys again afterwards to make sure it shows up in the future, but this is not strictly necessary
- Once you are done, you can either test running salt commands on the host or through alcali itself. I will usually recommend testing on the host as, if you are adding a key, you probably are looking to run the base
salt-call state.applynext
4.5) Checking on Minions
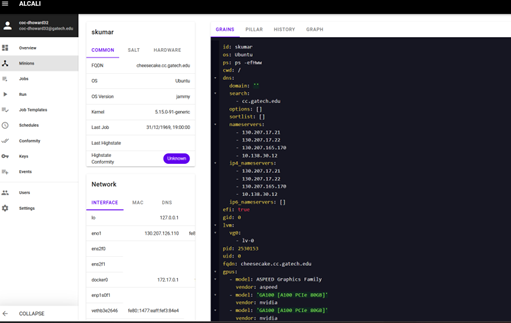
In the minions tab, you actually see the state of the server as far as salt is able to see it including the last state of all the grains, uptime, system information, etc.
To access here, simple click on the minions tab on the left menu. Once the minions begin populating, you can search for your minion in the top right search bar.
Once you click on the name of a minion, you shoul dbe taken to a page with lots of interesting information including grains, pillars, and the status of the last jobs that have run. You are also able to access hardware, OS, and network information as well in it's own section.

4.6) Sending Jobs
If you are developing salt code or simply wanting to check on the states of minions, you can also run salt commands through alcali similar to how you would run them on a local machine. The biggest difference is that instead of salt-call , you are running the salt command.
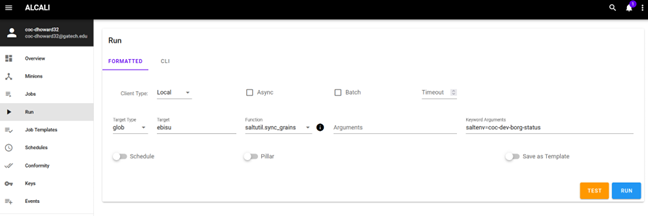
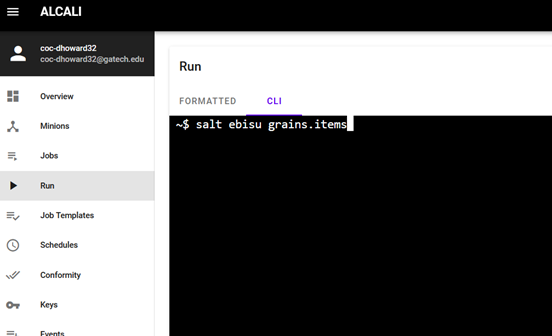
To access this page, go into the run tab on the left side of the page. Once here, you will have two options for sending salt commands, the gui, and CLI.
The primary advantage of the gui is that it allows you to have a bit of helper text and syntax checking when sending commands, which can super useful as you are getting accsutomed to the workflow, however, if you get to the point you would rather copy and paste a command for speed, that is also an option through the CLI.
To use the gui
- Set the target to the minion that you want to use. This feature does allow for globbing if you are looking for automation or want to just type
ebisu*instead ofebisu.cc.gatech.edu - The function is effectively all of the primary commands that salt supports, this dialog box does support partial searches in it if you are unsure of the specific command format
- Finally, the keyword arguments are where you would set your saltenv. This is primarily useful when developing in salt and wanting to have a specific state or grain run against a specific github branch
- In order to run a job in a specific branch the format should be
saltenv=<name of github branch>
- In order to run a job in a specific branch the format should be

In order to use the CLI
- As we don't get all the form fillable fields of the GUI, here you would enter a command just as you would on a minion directly, making sure to use
salt <hostname>instead ofsalt-call 
4.7) Additional features
- You can also check on the status of all the jobs that have run through salt, and filter those based on hosts
5) Working with Pepper
5.1) Prerequisites
This guide is intended to be an introduction an overview to pepper. While we won't be covering many of the other salt pieces involved, it is recommended to have an initial understanding of salt 101 and what the various salt realms are in order to understand everything that is being mentioned here. That knowledge can be found at the salt landing page. Additionally, we have a video guide that covers alcali in more detail in our salt 102 training that can be found on dropbox.
5.2) Introduction
Pepper is software service that we use for interacting directly with the salt master that can be locally hosted. We currently have a setup that we recommend using on spice-rack.cc.gatech.edu . This is mostly due to authentication requirements as well as consistency in documentation, but you could set this service up anywhere in our entwork if you know what you are doing.
Additional information about using Pepper can be found on the knowledgebase articles at https://docs.az.gatech.edu/s/190ffd15-195a-4b2f-ae4a-9316559a3816/doc/cli-access-pepper-kb0040091-75Thyp5Sua
If you are having trouble getting access, please refer to the guide in the Salt 101 page
5.3) What is Pepper
Pepper is a software service that allows us to interact with the salt master through a terminal interface that can be run and hosted on a server that we own. In our case, we are using the VM, spice-rack.cc.gatech.edu. Because of the nature of this being run through a VM instance, this gives many advantages for scripting commands, getting batch results, and automations. Functionally, it contains nearly the same capabilities as alcali, but is a separate interface and can be used if alcali is down, but the salt master is up. In addition, running commands in pepper uses a similar command structure to alcali and local host running.
5.4) Setting up Pepper
In order to set up pepper, you will first need to have access to the salt master, and I believe the same permissions needed when accessing alcali with your PSA account. Details for getting that access should be available at please refer to the guide in the Salt 101 page Salt 101 page.
To set up pepper, first you will want to be logged in to spice-rack.cc.gatech.edu with your regular user account. We need to user our individual accounts (and not root) because all of the pepper commands we are running will need to be authenticated with our individual PSA accounts. Once you are logged in
mkdir pepperpython3 –m venv pepper/source pepper/bin/activatepip3 install salt salt-pepper
Once all of this is set up, you should be able to open the virtual environment with source pepper/bin/activate and run all of your commands from there.
Adding some pepper configurations
Now that pepper is set up, you will want to configure some environmental variables. Technically, you can manually include these in each command you sendbut setting them up is much easier.
You will want to edit your ~/.pepperrc file to include the following information, substituting the username for your psa account name
[main]
# Retrieve <env> from the list of environments (KB0040107)
SALTAPI_URL=https://cocsalt.az.gatech.edu
SALTAPI_USER=<YOUR-PSA-ACCOUNT-HERE>
SALTAPI_EAUTH=ldap
This files does allow you to enter your password as well as entering commands through pepper will require that on every commands, however, please be aware of any risk of storing your password in plain text in a configuration file and take appropriate security measures to make sure it is stored as a secret..
5.5) Accepting New Minion Keys with Pepper
A common use of Pepper in the case of alcali being down or if you are doing work in batch, is being able to accept the keys of a new minion in pepper
After opening your virtual environment enter
pepper --client wheel key.accept match='["MINIONNAME"]'
Replacing the MINIONNAME with the appropriate host name of the server you are trying to add. Please be aware that the single and double quotes are incredibly specific for this command to function
5.6) Running Jobs with Pepper
Running jobs in pepper is incredibly similar to running jobs in the CLI on alcali and running them on individual hosts. However, instead of using salt or salt-call, you will want to preface everything with pepper instead.
In general running a job is the same format as other salt commands with pepper <minion-name> <command-name> <sale-env> , but some specific examples you might see when developing include
Applying states
pepper <minion_name> state.apply
Checking the grains
pepper <minion_name> grains.items
Syncing a minion with your local branch
pepper <minion_name> saltutil.sync_grains coc-dev-<your local git branch>
6) How to swap to the salt dev environment in a test minion
Placeholder until we are able to fill this part out
7) Debugging Tricks with Salt
7.1) Salt grains can be defined/bootstrapped/seeded
- /etc/salt/grains
- /etc/salt/minion.d/{filename}
Above files (or a custom pillar, or a grain implementation for inventory.cc) allow for setting a top.sls file to select sub-sls files specific to:
- Operations
- Instruction
- Research
7.2) Debugging States/Pillars/Grains (from Minion)
- Show running/rendered top file:
salt-call state.show_top - Show non-top sls file:
salt-call state.show_sls qualys --out yaml - List available grains on the system:
salt-call grains.ls - List all grains and their contents (verbose):
salt-call grains.items - Single grain:
salt-call grains.get {grain}
